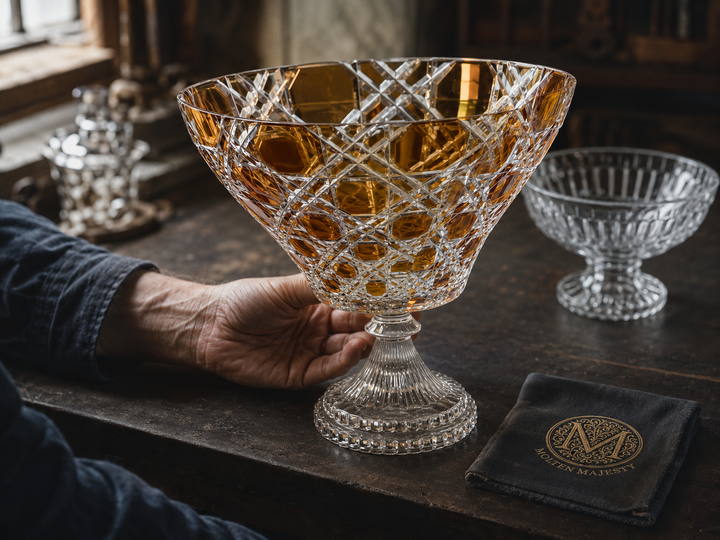
Cut-to-clear crystal is typically made by combining a clear glass body with a contrasting coloured layer, then removing selected areas of that outer colour after the vessel has cooled. The clear glass revealed beneath becomes part of the pattern. The result is not printed decoration. It is a design cut into the object itself.
The quality of the finished piece depends on the proportion of the blank, the discipline of the cutting and the clarity of the polish. For a broader explanation of the material and its related techniques, begin with our guide to cut crystal glassware.
What does cut-to-clear mean?
Cut-to-clear describes a decorative effect in which a coloured surface layer is cut through to reveal clear glass below. The contrast may be bold, as in sapphire blue against transparent crystal, or quieter, as in amber, rose or emerald tones crossed by fine clear lines.
The phrase describes the relationship between colour and cutting. It does not, by itself, prove that a vessel was handblown, hand-cut or made from a particular crystal composition. Those are separate claims and should be stated separately.
The process at a glance
| Stage | What happens | Why it matters |
|---|---|---|
| Forming | A vessel is shaped with enough balance and material for the intended decoration. | The pattern must belong to the silhouette beneath it. |
| Colour | A contrasting coloured layer is combined with clear glass. | This creates the field from which the clear design will be revealed. |
| Planning | The pattern is mapped around the curves, rim, stem or foot. | Good planning keeps the design coherent as the form changes. |
| Cold cutting | Rotating wheels and abrasives remove selected areas after the glass has cooled. | The depth and direction of each cut control the clear pattern and its reflections. |
| Polishing | The newly cut surfaces are refined and polished. | Polishing restores transparency and allows light to travel cleanly through the cuts. |
| Inspection | Edges, symmetry, surfaces and finish are examined. | The piece must work as an object, not merely as a collection of motifs. |
1. The blank must be designed for cutting
The process begins before a cutter approaches the wheel. A blank is the formed but undecorated vessel that will receive the pattern. It needs the right proportion, wall thickness and balance for the work planned on its surface.
A deep diamond pattern asks something different of a bowl than a narrow engraved line asks of a goblet. The cutter removes material, so the original form must allow the design to develop without weakening the object or making it visually heavy.
This is one reason fine cut glass cannot be judged by ornament alone. The silhouette remains the quiet authority underneath it.
2. Clear glass and colour are brought together
In cut-to-clear work, the coloured layer and the clear body are joined before the final pattern is cut. Makers can create layered glass in more than one way, and the exact forming sequence varies by workshop and object.
What matters to the finished effect is that the coloured area is thick and even enough to cut with control, while the clear body retains the proportions required by the vessel. If the colour varies too sharply in thickness, a repeated cut can reveal inconsistent borders. If the blank lacks balance, even precise decoration will struggle to look composed.
3. The pattern is planned around a three-dimensional form
A pattern drawn on paper occupies a flat field. A pattern on glass must travel around a curve.
Diamonds widen and narrow as a bowl changes circumference. Long mitres approach the rim at a different angle from the body. A motif that appears generous on the open side of a vase may become crowded near its base. Planning resolves these changes before cutting begins.
The best patterns do not look applied to the vessel. They appear to have been waiting inside it.
4. Cutting begins after the glass has cooled
The Corning Museum of Glass uses cold working as the collective term for techniques, including cutting and copper-wheel engraving, that alter glass when it is cold. This distinguishes the cutting stage from the hot work used to form the vessel.
At the wheel, the cutter brings the glass into controlled contact with an abrasive surface. Broader cuts establish the principal geometry. Narrower wheels refine intersections, borders and smaller motifs. On coloured overlay work, every pass also decides how much clear glass will be visible.
The process is reductive. Once glass has been removed, it cannot be placed back. Confidence at the wheel therefore includes knowing when to stop.
5. Engraving and cutting perform different work
Cutting often creates facets, grooves and geometric structure. Engraving can introduce finer lines, shallow relief and illustrative detail. The two techniques may appear together, though they are not interchangeable labels.
The Victoria and Albert Museum describes traditional glass cutting as the removal of material with a rotating wheel, water and abrasive, followed by polishing with softer wheels. Its account of wheel engraving shows how smaller rotating wheels can produce intricate relief and matte detail.
On a well-resolved piece, the technique serves the design. A broad facet catches the room. A fine engraved line rewards the closer look.
6. Polishing returns light to the cut surfaces
Freshly ground glass is pale and matte. The cut exists, but its optical character has not yet been restored.
Polishing refines those surfaces through progressively finer abrasives and softer tools. The Victoria and Albert Museum notes the use of wood, cork or felt wheels after cutting. When the finish is successful, the clear areas read as transparent rather than chalky, and the border between colour and clarity becomes more articulate.
This stage explains why two pieces with similarly ambitious patterns can feel entirely different. Complexity attracts the eye. Finish keeps it there.
7. The finished piece is read as a whole
Inspection is not limited to counting cuts. The maker considers whether motifs meet cleanly, whether the pattern remains balanced around the full circumference, whether cut surfaces are polished and whether the rim, stem, foot and body still feel related.
Small variations can be evidence of handwork, but variation is not a substitute for control. Hand-cut does not mean approximate. It means that practiced judgment is present at every turn of the object.
How can you recognise cut-to-clear crystal?
Turn the piece slowly under side light and look for the relationship between the coloured surface and the clear cuts beneath it.
- Look at the borders. Clear motifs should pass decisively through the coloured layer.
- Follow the pattern around curves. Thoughtful adjustments reveal how the design responds to the form.
- Examine deep recesses. Well-polished cuts handle light more cleanly than unfinished, cloudy surfaces.
- Compare repeated motifs. Controlled variations can indicate hand guidance, while identical repetition may suggest a more mechanised process.
- Read claims separately. Colour, crystal composition, forming method, cutting method and place of production are different facts.
If you are comparing cut decoration with moulded pattern, our guide to hand-cut crystal and pressed glass explains the most useful visual clues and the limits of familiar folk tests.
Is cut-to-clear the same as coloured crystal?
No. Coloured crystal is the broader category. A piece can be coloured throughout, decorated with colour, or made from layered glass without having a pattern cut through the outer colour.
Cut-to-clear is more specific. The design depends on deliberate removal: colour remains where the surface is left intact, while clear glass appears where the cutter has worked.
Does cut-to-clear mean handblown?
Not necessarily. Forming and decorating are separate stages. A vessel may be handblown and later hand-cut, formed with the assistance of a mould and later hand-cut, or produced through another combination of processes.
Reliable product information should identify each stage honestly. A magnificent adjective cannot perform the work of provenance.
From the Molten Majesty atelier
Molten Majesty works in small batches in Istanbul, where glass moves through specialist hands from forming to cutting, engraving, finishing and inspection. Facets and motifs are cut by hand to guide light across the surface. Colour, gold and platinum are used with restraint so ornament remains in service to the form.
The Verdura collection offers a particularly clear way to observe this relationship. Its coloured surfaces and geometric cuts change character as the object turns, moving between saturated colour, transparent detail and reflected light.
That changing view is the point. Cut-to-clear crystal is not designed to reveal everything at once.
How should cut-to-clear crystal be cared for?
Follow the instructions supplied for the individual piece. In general, protect cut crystal from impact, abrasive cleaners and sudden temperature changes. Wash pieces separately when hand washing is recommended, and use a soft cloth rather than forcing fabric into narrow cuts.
Our complete guide explains how to clean crystal glassware without clouding or scratches, including safe drying and handling practices.
The essential distinction
Cut-to-clear crystal is an encounter between colour and removal. The maker first creates the field, then gives part of it away.
The visible result is easy to admire: clear geometry held inside colour, with every movement changing the balance between the two. The hidden achievement is discipline. Forming, planning, cutting, polishing and inspection must all agree before the light does.
Last refined August 2, 2026